


Oracle APEX Push Notifications ACL & Certificate Fix for On Premise Installations


If you've downloaded APEX 23.1 and want to use the latest Push notifications, here is a short guide to resolve the ACL & Certificate issues you will encounter. The errors you'll encounter are
ORA-24247: network access denied by access control list (ACL)
ORA-29024: Certificate validation failure
You'll see these errors in Manage Instance > Push Notifications Queue

Note: These are all pre-configured on apex.oracle.com instances
Note: If you want to apply this fix for ADB ATP/ADW then read this first.
However, you do need to configure them yourself for the APEX 23.1 On-Premise downloadable version. For example, you may have it running on Docker, VM Appliance or your laptop.
Please follow these steps to configure :
Credits to oracle-base.com for the information on ACL & Certificate Installation
Open SQL*Plus
sqlplus / as sysdbaSet the PDB
ALTER SESSION SET CONTAINER = FREEPDB1;Configure a fine-grained ACL for the following as SYS AS SYSDBA.
Credits here
 declare
     l_principal varchar2(20) := 'APEX_230100'; -- Replace with current APEX user
     l_hosts apex_t_varchar2  := apex_t_varchar2(
                                     '*.push.apple.com',
                                     '*.notify.windows.com',
                                     'updates.push.services.mozilla.com',
                                     'android.googleapis.com',
                                     'fcm.googleapis.com' );
 begin
     for j in ( select column_value as hostname from table(l_hosts) ) loop
         dbms_network_acl_admin.append_host_ace (
             host       => j.hostname,
             lower_port => 443,
             upper_port => 443,
             ace        => xs$ace_type(
                               privilege_list => xs$name_list('connect'),
                               principal_name => l_principal,
                               principal_type => xs_acl.ptype_db) );

         dbms_network_acl_admin.append_host_ace (
             host       => j.hostname,
             ace        => xs$ace_type(
                               privilege_list => xs$name_list('resolve'),
                               principal_name => l_principal,
                               principal_type => xs_acl.ptype_db) );

         dbms_network_acl_admin.append_host_ace (
             host       => j.hostname,
             lower_port => 443,
             upper_port => 443,
             ace        => xs$ace_type(
                               privilege_list => xs$name_list('http'),
                               principal_name => l_principal,
                               principal_type => xs_acl.ptype_db) );
     end loop;
 end;
or otherwise, create an Open ACL (not advisable) using the script provided
 BEGIN
   DBMS_NETWORK_ACL_ADMIN.create_acl (
     acl          => 'open_acl_file.xml',
     description  => 'A test of the ACL functionality',
     principal    => 'APEX_230100',
     is_grant     => TRUE,
     privilege    => 'connect',
     start_date   => SYSTIMESTAMP,
     end_date     => NULL);

   DBMS_NETWORK_ACL_ADMIN.assign_acl (
     acl         => 'open_acl_file.xml',
     host        => '*',
     lower_port  => 1,
     upper_port  => 9999);

   COMMIT;
 END;
 /
Next drop into Bash, If you've been following my Docker guide here, then the next steps are perfect for you.
docker exec -it 23cfree /bin/bashMake a wallet location
mkdir -p /home/oracle/software/walletCreate a new wallet
orapki wallet create -wallet /home/oracle/software/wallet -pwd WalletPasswd123 -auto_loginNow Add the Mozilla, Google (Firebase & Android), Apple, & Microsoft Certificates
 # Mozilla
 curl -o /home/oracle/software/isrgrootx1.der "https://letsencrypt.org/certs/isrgrootx1.der"
 # Google
 curl -o /home/oracle/software/gts1c3.der "http://pki.goog/repo/certs/gts1c3.der"
 # Apple
 curl -o /home/oracle/software/apsecc12g1.der "http://certs.apple.com/apsecc12g1.der"
 # Microsort
 curl -o /home/oracle/software/ms-azure.crt "http://www.microsoft.com/pkiops/certs/Microsoft%20Azure%20TLS%20Issuing%20CA%2006%20-%20xsign.crt"

 orapki wallet add -wallet /home/oracle/software/wallet -trusted_cert -cert "/home/oracle/software/isrgrootx1.der" -pwd WalletPasswd123
 orapki wallet add -wallet /home/oracle/software/wallet -trusted_cert -cert "/home/oracle/software/gts1c3.der" -pwd WalletPasswd123
 orapki wallet add -wallet /home/oracle/software/wallet -trusted_cert -cert "/home/oracle/software/apsecc12g1.der" -pwd WalletPasswd123
 orapki wallet add -wallet /home/oracle/software/wallet -trusted_cert -cert "/home/oracle/software/ms-azure.crt" -pwd WalletPasswd123
In APEX, Log in to Internal Workspace
Click Manage Instance > Instance Settings
In Wallet Path paste in the following...
file:/home/oracle/software/walletEnsure Auto-Login Wallet is checked
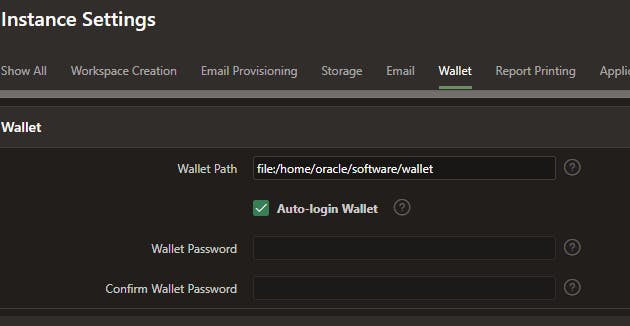
Click Apply Changes
Now go to Manage Instance > Push Notifications Queue
Click Force Push Queue and the notifications should dispatch
ENJOY