

Keycloak Authentication with APEX

With around 20 years on the job, Matt is one of the most experienced software developers at Pretius. He likes meeting new people, traveling to conferences, and working on different projects.
He’s also a big sports fan (regularly watches Leeds United, Formula 1, and boxing), and not just as a spectator – he often starts his days on a mountain bike, to tune his mind.
Keycloak is a handy tool for managing user authentication. Specifically, I'll provide steps on how to use Keycloak to authenticate with Oracle APEX.
Once Authenticated, the Groups the User is a member of will be derived as native authorization schemes in APEX.
It's a practical approach to secure APEX Applications.
If you want to install and configure your own Keycloak instance on Oracle Cloud Compute (which works great on Always Free Micro) then follow this guide:
https://mattmulvaney.hashnode.dev/keycloak-installation-for-oracle-compute-with-custom-domain-apex-configuration
Preparation
Run the following in SQL Workshop
select APEX_AUTHENTICATION.GET_CALLBACK_URL from dual;From the results, just copy everything up to the callback phrase, e.g
https://apex.oracle.com/pls/apex/apex_authentication.callbackPaste this into Notepad as the Callback URL
Keycloak
Login to Keycloak Admin Panel
Click master > Create Realm

Select a Realm Name

Click Groups
Create 3 groups for MANAGERS, SUPERVISORS and SUPERUSERS

Click Users
Create a User and join all groups

Click Create
Click Credentials > Set Password

Click Save
Click Clients > Create Client and enter a random Client ID. Also, save this Client ID to Notepad.

Click Next and switch Client Authentication & Authorization to the On position.

Click Next
Enter the Root URL of your APEX application. e.g.
https://g4cf-lufatp.adb.eu-frankfurt-1.oraclecloudapps.com/ords/r/Enter a Home URL of the home URL e.g. My app called l which is a bit confusing
https://g4cf-lufatp.adb.eu-frankfurt-1.oraclecloudapps.com/ords/r/wksp_x/l?request=APEX_AUTHENTICATION%3DKEYCLOAKEnter a Valid Redirect URL of the callback e.g.
https://g4cf-lufatp.adb.eu-frankfurt-1.oraclecloudapps.com/ords/apex_authentication.callbackEnter a Valid Post logout redirect URL e.g.
https://g4cf-lufatp.adb.eu-frankfurt-1.oraclecloudapps.com/ords/*Click Save
Click on Credentials and copy the Client Secret to Notepad.
Click on Realm Settings and copy the URL from OpenID Endpoint Configuration to Notepad

Click Client Scopes > Create Client Scope
Complete the form as per the picture below

Click Save
Click on Mappers > Configure a new Mapper
Click on Group Membership
Complete the form like this

Click Save
Click Client Scope Details in the breadcrumb
Click on Scope > Assign Role
Select default-roles-[your realm]

Click Assign
Click Clients > APEX Client > Client Scopes > Add Client Scopes > Check groups

Click Add > Default
APEX Configuration
In APEX click App Builder > Workspace Utilities > Web Credentials > Create
Use the following table:
Name: KEYCLOAK
Client ID or Username: Paste Client ID from Notepad
Client Secret or Password: Paste Client Secret from Notepad
Verify Client Secret or Password: Paste Client Secret from NotepadClick Create
Click Shared Components > Authorization Schemes > Create > Next
Use the table below:
Click Create Authorization Scheme
Use the following details:

Click Create to create a new Authorization Scheme and click Next
Repeat the above steps to create Authorization Schemes for MANAGERS and SUPERUSERS (as appropriate)
Click Shared Components > Security Attributes > Source for Role or Group Schemes and set it to Custom Code

Click APEX Application > Shared Components > Application Items > Create
In Name type G_SUB and click Create Application Item
Click APEX Application > Shared Components > Authentication Schemes > Create
Click Next on Based on a pre-configured scheme from the gallery
Use the following table
Name: KEYCLOAK
Scheme Type: Social Sign-In
Credential Store: KEYCLOAK
Discovery URL: Paste Discovery URL from Notepad
Scope: email,profile,groups
Username: email
Additional User Attributes: sub,user_id,name
Map Additional User Attributes To: G_SUB
Click Create Authentication Scheme
Click on KEYCLOAK Authentication Scheme
Set Switch in Session to Enabled
In the Source > PL/SQL Code > paste the code below.
 PROCEDURE p_post_processing
  IS
    l_group_names apex_t_varchar2;
  BEGIN

    -- add all group names to l_group_names
    for i in 1 .. apex_json.get_count('groupmembership') loop
        apex_string.push (
          p_table => l_group_names,
          p_value => apex_json.get_varchar2 (
                        p_path => 'groupmembership[%d]',
                        p0     => i ));
    end loop;

    -- save group names in session
    apex_authorization.enable_dynamic_groups (
        p_group_names => l_group_names );

  END p_post_processing;
On the Post-Authentication Procedure Name type
p_post_processingClick Apply Changes
On Page 1, add an Interactive Report region using the following SQL statement
select *
  from APEX_WORKSPACE_SESSION_GROUPS
 where apex_session_id = :APP_SESSION
This will show you the Keycloak Roles that have been translated into Dynamic Groups
Optional: Add a test, you can add the MANAGERS, SUPERVISORS or SUPERUSERS APEX Authorization Schemes to APEX Components, to test that the Authorization is working correctly.
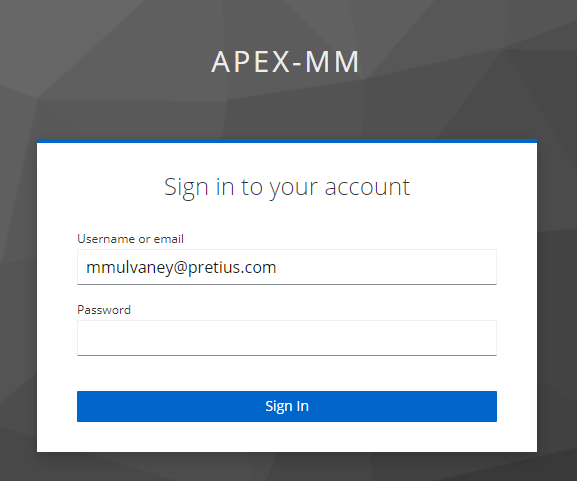
Run the APEX App and you'll see a Login Screen. Enter your KEYCLOAK User Credentials and click Sign-In
Once in your APEX application, you should see the Keycloak Roles, mapped to APEX Authorizations & correctly observed by APEX. You should also see three entries in your Interactive Report

Sign out of APEX and you will see the Keycloak Login screen again, all set to log back into APEX
ENJOY!
Credits to Artur Morawski for lending me his Keycloak instance and cracking this Authentication before I did.
Whats the picture? From a Train Window near Huddersfield (not the HS2 - lol Rishi). Visit Yorkshire!


