


When opening Social Sign in to your application, you are opening up a wide audience of potential connections. What if you want to control access om some way?
There are two solutions here:
1) Control everything in PL/SQL using the API in the Post Authentication Trigger in APEX. You can see this in action in my blog where users not holding a specific role are immediately logged out. This might be a more convenient solution for you.
2) Control everything before logging on to APEX using Auth0 actions
In this blog, we are going to focus on Auth0 actions.
Auth0 Actions can be used to limit Access Control. Although the method described in the above link uses api.access.deny which creates an infinite redirect loop during APEX authentication which can be resolved by using the api.redirect.sendUserTo API to redirect to the logout URL
The above is a simple one-liner, which after following this guide you can always overwrite the code with the api.redirect.sendUserTo approach
In this example, I'll demonstrate using the API to allow all users into APEX, and give them a defaulted role if they do not already have a ORG: role. This paragraph makes more sense if you've read my other role-based emulation blog
This blog assumes you have an APEX Application already authenticating with Auth0. If not, follow this guide first.
Steps
In Auth0 Dashboard, go to APIs > Auth Management API > Machine To Machine Applications > Find your APEX Application and expand the down chevron 🔽 to show the Permissions

Ensure read:roles + create:roles + update:roles are selected as per the picture above.
Click Update
Go to User Management > Roles
Choose your default role by either Creating a New Role Or Editing an existing Role.

Copy the Role ID to Clipboard

Go to Actions > Library > Custom > Build Custom
Create an Action using the following details

Add auth0 (in lowercase) as a dependency

Click Create
Add a Secret for defaultRole pasting the ID you have in your clipboard

Click Create
Add another secret for domain but without the https:// protocol e.g dev-ipga63.uk.auth0.com
Add another secret for clientId pasting in the Client ID
Add another secret for clientSecret pasting in the Client's Secret ID
In the code section, replace everything with
exports.onExecutePostLogin = async (event, api) => {
  const namespace = "https://my-app.example.com";

  const ManagementClient = require("auth0").ManagementClient;

  const management = new ManagementClient({
    domain: event.secrets.domain,
    clientId: event.secrets.clientId,
    clientSecret: event.secrets.clientSecret,
    scope: "read:roles create:roles update:roles",
  });

  const defaultRole = { id: event.secrets.defaultRole };
  const userRoles = await management.getUserRoles({ id: event.user.user_id });
  var data = { "users": [event.user.user_id] };

  try {
    if (event.authorization) {
      if (!event.user.email_verified) {
        return;
      } else {
        const hasOrgRole = userRoles.some(role => role.name.startsWith("ORG"));
        const hasDefaultRole = userRoles.some(role => role.id === event.secrets.defaultRole );

        if (!hasOrgRole && !hasDefaultRole) {
          api.idToken.setCustomClaim(`${namespace}/roles`, event.secrets.defaultRole);
          api.accessToken.setCustomClaim(`${namespace}/roles`, event.secrets.defaultRole);
          await management.roles.assignUsers(defaultRole, data);
        }
      }
    }
  } catch (e) {
    console.log(e);
  }
};
Click Deploy
Click on Actions > Flows > Login
Click on Custom tab
Drag the Assign Default Role action to the place in the diagram below
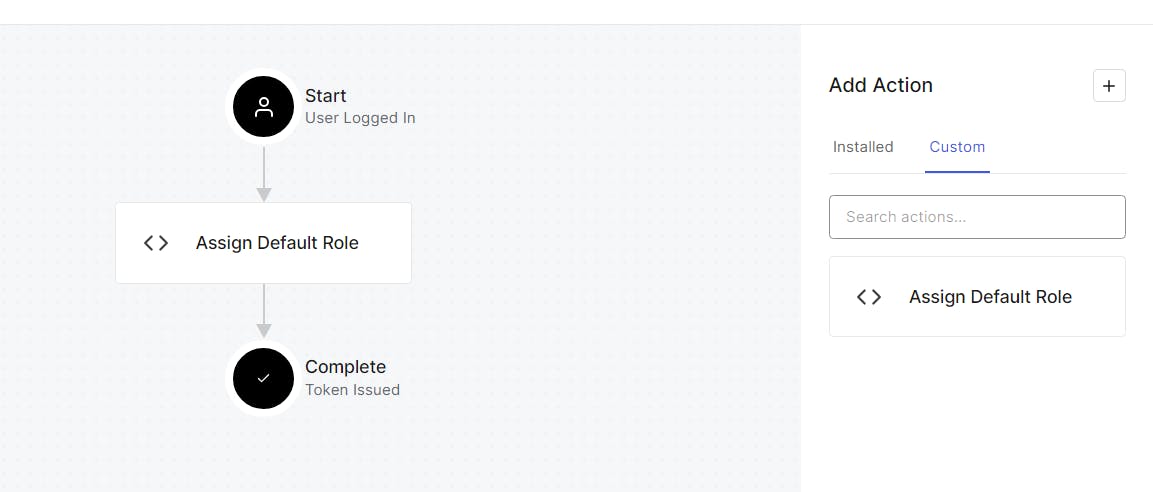
Click Apply
Sign out
Note this link might help (replace with your domain)https://dev-ipga6.uk.auth0.com/v2/logoutSign In back into your application
Click on User Management > Users > Select your user
Ensure that the Default Role has been assigned

Enjoy!
Troubleshooting
Click on Monitoring > Logs and you can see what happing
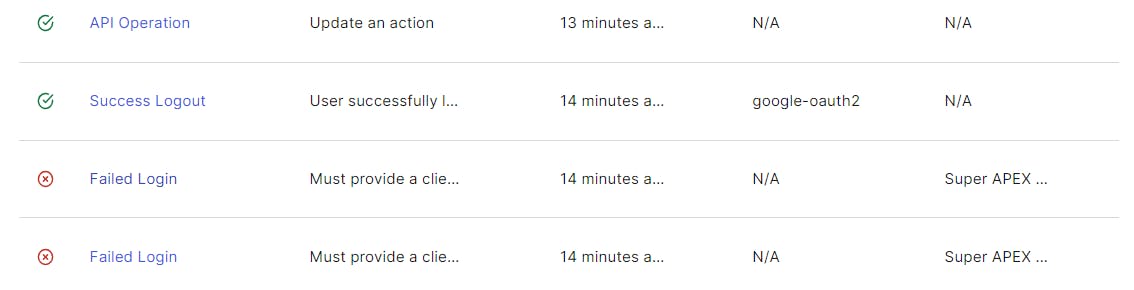
When clicking on an entry, you can change to the Action Details tab to diagnose the problem

Console logs also appear in this JSON output.
What's the picture? It's a field towards the end of summer, east of Ripon. Visit Yorkshire!