


Welcome back to the Social Sign-In blog series! In this installment, I explore the process of configuring Authentication between APEX and Azure Active Directory.
Unlike the previous blogs, I will be focusing solely on this particular aspect and saving the discussion on Roles and Groups for a future post. A comprehensive blog on pure Azure Authorization is on its way!
As Microsoft's Azure Active Directory evolves into Microsoft Entra ID, I plan to expand the coverage to include Entra ID once the conversion takes place. But for now, let's dive into the steps and insights on establishing seamless Authentication integration between APEX and Azure Active Directory.
Let's get started!
Pre-Requisites
Run the following in your SQL Workshop
select APEX_AUTHENTICATION.GET_CALLBACK_URL from dual;From the results, just copy everything up to the callback phrase, e.g
https://g4cf7-lufatp.adb.eu-frankfurt-1.oraclecloudapps.com/ords/apex_authentication.callbackPaste this into Notepad as the Redirect URI
Obtain your APEX Home URL.. and paste it to Notepad as Home URL e.g.
[BASE URL]/ords/r/[WORKSPACE]/[APP]/home?request=APEX_AUTHENTICATION%3DAZUREe.g make sure it has AZURE on the end
https://g4cf7-lufatp.adb.eu-frankfurt-1.oraclecloudapps.com/ords/r/wksp_x/z-products/home?request=APEX_AUTHENTICATION%3DAZURE
Azure Configuration
Sign in to the Azure portal portal.azure.com with an Azure Cloud Account. You cannot access with just any Microsoft Account.
To Sign up for a Free 12 Months:
- Go to https://www.azure.com and click the green “Start free” button.
- Next, click another “Start free” button.
- If you already have an account with Microsoft, for example, Microsoft 365
- You'll be prompted to log in.
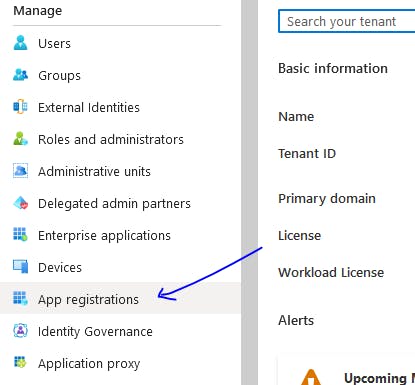
- When you log in, some of your details may already be there.In the Azure portal, navigate to the Azure Active Directory (AAD) service. You can either search for "Azure Active Directory" in the search bar or locate it under the "All services" menu.
In the Azure Active Directory menu, select App registrations
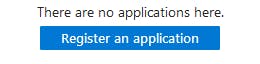
Click on the Register an Application button to create a new application registration.
Provide the details as follows:
It's highly recommended to read up on the correct Account Type for you.
Name: APEX Application
Supported Account Types: Accounts in any organizational directory (Any Azure AD directory - Multitenant) and personal Microsoft accounts (e.g. Skype, Xbox)
Redirect URI Type: Web
Redirect URI URL: Redirect URI from Notepad (step 1)
Click Register
When the Application is registered, in the Essentials
Copy the Application (client) ID to Notepad
Copy the Directory (tenant) ID to Notepad as Tenant ID
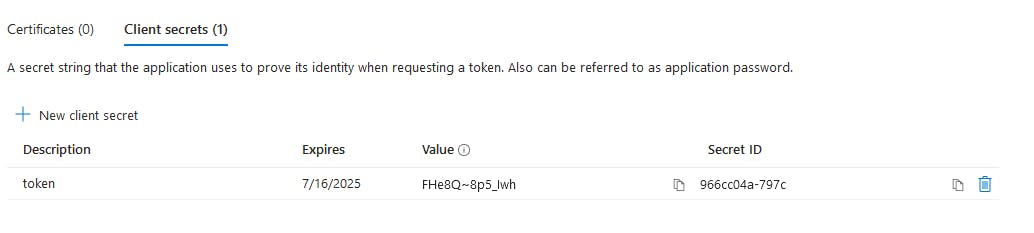
Click Add a certificate or secret and then click New client secret

Use the details below:
Description: token
Expires: 730 days (24 months)
Click Add
After generation copy only the Secret ID to Notepad. i.e. there is no need to copy the Value column.
Click on Owners in the side-bar under Manage
Click Add Owners, check your username and click Select
Click on Authentication in the side-bar under Manage
In Front-channel Logout In the Post-logout type in the HOME URL
i.e[BASE URL]/r/[WORKSPACE]/[ALIAS]/home?request=APEX_AUTHENTICATION%3DAZUe.g
[BASE URL]/ords/r/[WORKSPACE]/[APP]/home?request=APEX_AUTHENTICATION%3DAZURECheck the ID tokens (used for implicit and hybrid flows) checkbox and click Save

APEX Configuration
Prepare a Discovery URL
Replace the following Discovery URL below with the Tenant ID you copied to Notepadhttps://login.microsoftonline.com/{tenant-id}/.well-known/openid-configurationIn APEX click App Builder > Workspace Utilities > Web Credentials > Create
Use the following table
Name: AZURE
Client ID or Username: Paste in from Notepad
Client Secret or Password: Paste in from Notepad
Verify Client Secret or Password: Paste in from Notepad
Click Create
Go to your APEX Application > Authentication Schemes > Create
Click Next on Based on a pre-configured scheme from the gallery
32. Use the following table
| Name | Value | | --- | --- | | Name | AZURE | | Scheme Type | Social Sign-In | | Credential Store | AZURE | | Discovery URL | Paste in the Discovery URL from Notepad i.e the one that ends with /.well-known/openid-configuration | | Scope | profile,email,user.read | | Username | name | | Additional User Attributes | profile,groups |
NOTE: You can use email for Username, however, I had issues with Azure not correctly fetching email from the profile for newly added users. Therefore I've left it as name.
Click Create Authentication Scheme
Click on AZURE Authentication Scheme
Set Switch in Session to Enabled
In the Post-Logout URL, set Go To to URL
Set URL to your Home URL
e.g.https://g4cf7-lufatp.adb.eu-frankfurt-1.oraclecloudapps.com/ords/r/wksp_x/z-products/home?request=APEX_AUTHENTICATION%3DAZUREThis should ensure that you can log out of Azure and then return to the APEX Application
In Post-Authentication Procedure Name type p_post_processing
In the Source > PL/SQL Code > paste the code below
  PROCEDURE p_post_processing
  IS
    l_group_names apex_t_varchar2;
    l_values apex_json.t_values;
  BEGIN

   -- Parse Roles
    apex_json.parse (
        p_values => l_values,
        p_source => apex_json.get_varchar2('roles')
    );

    --
    -- add all group names to l_group_names
    --

    FOR i IN 1.. apex_json.get_count(p_path=>'.',p_values=>l_values)  LOOP
        apex_string.push (
          p_table => l_group_names,
          p_value => apex_json.get_varchar2(p_path=>'[%d]',p0=> i,p_values=>l_values)
        );

    END LOOP;

    -- save group names in session
    apex_authorization.enable_dynamic_groups (
        p_group_names => l_group_names );

  END p_post_processing;
On Page 1, add an Interactive Report region using the following SQL statement
select *
  from APEX_WORKSPACE_SESSION_GROUPS
 where apex_session_id = :APP_SESSION
This will show you the AUTH0 Roles that have been translated into Dynamic Groups
Run the APEX App and you'll see a Login Screen. Enter your AZURE User Credentials and click continue

Once in your APEX application, you should see the Auth0 Roles, mapped to APEX Authorizations & correctly observed by APEX. You should also see role entries in your Interactive Report

Sign out of APEX and you will see the Azure Login screen again, all set to log in to APEX
ENJOY!
What's the cover image in this blog? It's Skipton. Visit Yorkshire!