


This blog sets up OKTA Authentication with APEX and then delivers the Users' OKTA Groups to APEX and maps them to custom roles.
This extends another blog of mine to enable OKTA Authentication.
Instructions
Sign up for an OKTA Account at https://www.okta.com/uk/free-trial/
Save the Login & Org URL shown on the "Welcome" page to Notepad
Wait for the confirmation email and Activate the account by setting a new password & elect to set up the MFA later

Click Directory > People and view the users. You can optionally add new people

Click Directory > Groups > Add Group > Name = APEX > Save
Click Directory > Groups > Add Group > Name = Supervisors > Save
Click Directory > Groups > Add Group > Name = Empty > Save
Click on group APEX > Assign People > + (the plus symbol next to your username) > Done

Follow the Database & APEX Configuration steps in my Achieving a SaaS Model for multi-tenant APEX Applications using Oracle IAM Domains blog
Click Applications > Applications > Create App Integration
Select OIDC - OpenID Connect & Web Application and Click Next
Use the following setting in OKTA
App Integration Name = APEX ApplicationRun the following in your SQL Workshop
select APEX_AUTHENTICATION.GET_CALLBACK_URL () from dual;From the results, just copy everything up to the callback phrase, e.g
https://apex.oracle.com/pls/apex/apex_authentication.callbackPast this in to Sign In Redirect URLs in OKTA
In the Post-logout redirect URL type the following (we are going to use DOMAIN3 in this example here)
[BASE URL]f?p=[APPLICATION ALIAS]:1::APEX_AUTHENTICATION=DOMAIN3e.g
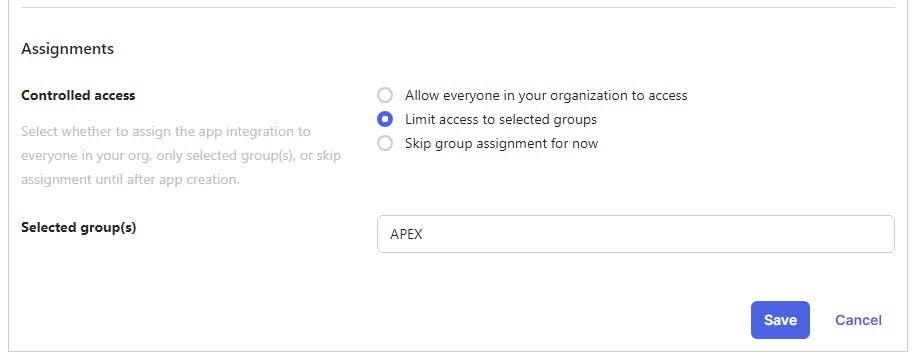
https://apex.oracle.com/pls/apex/f?p=T-PRODUCTS:1::APEX_AUTHENTICATION=DOMAIN3For Controlled access select Limit access to selected groups and choose Group APEX
Leave all settings as there are. When it resembles the following, click Save

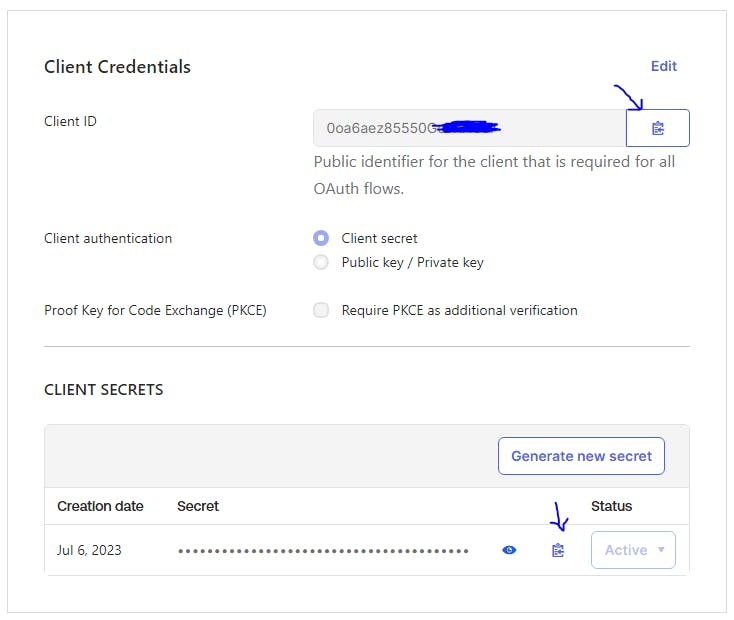
Copy the Client ID & Secret and copy to Notepad
Optional - For Demonstration purposes, we'll switch to Password only, deactivating MFA
In OKTA click Security > Authentication Policies > Password Only ~ View > Add App > APEX Application > Add >; Close
Click Switch Policy > Switch Policy > Save
Next, we need to set up an API key.
Click Security > API > Token >; Create Token > mytoken > Create Token > Copy Value to Notepad > Ok Got ItNext, set some Privileges.
Click Applications > Applications > APEX Application > OKTA API Sscopes > okta.groups.read > ✔️GrantIn APEX > Application Builder > Shared Components > Create > Name = G_SUB > Create Application Item

In APEX click App Builder > Workspace Utilities > Web Credentials > Create
Use the following table
Name
Value
Name
OKTA.APEX.DOMAIN_3
Client ID or Username
Paste in from Notepad
Client Secret or Password
Paste in from Notepad
Verify Client Secret or Password
Paste in from Notepad
Click Create
Click APEX Application > Authentication Schemes > Create
Click Next on Based on a pre-configured scheme from the gallery
Use the following table
Name
Value
Name
DOMAIN3
Scheme Type
Social Sign-In
Credential Store
IAM.APEX.DOMAIN_3
Discovery URL
https://${yourOktaOrg}/.well-known/openid-configuration, where${yourOktaOrg}is replaced with your OKTA URL, likehttps://dev-999999-admin.okta.com/.well-known/openid-configurationsee https://developer.okta.com/docs/concepts/auth-servers/#org-authorization-server-discovery-endpoints for more details)Scope
profile
Username
name
Additional User Attributes
sub,profile
Map Additional User Attributes To
G_SUB
Click Create Authentication Scheme
Click on Authentication Scheme DOMAIN3
Use the following table
Name
Value
Source
Paste in Code Below
Post-Authentication Procedure Name
p_post_processing
Switch in Session
Enabled
Post-Logout URL
URL
URL
Your Post-logout redirect URL e.g apex.oracle.com/pls/apex/f?p=T-PRODUCTS:1::..
PROCEDURE p_post_processing
IS
    l_clob          CLOB;
    j            APEX_JSON.t_values;
    l_group_names apex_t_varchar2;
    l_api_key_c  CONSTANT VARCHAR2(256) DEFAULT '<YOUR API KEY>';
    l_org_url_c  CONSTANT VARCHAR2(256) DEFAULT 'https://<YOUR ORG URL>.okta.com';
BEGIN

   apx_tenant.p_set_tenant_id( 'DOMAIN_3');

    apex_web_service.set_request_headers(
        p_name_01        => 'Content-Type',
        p_value_01       => 'application/json',
        p_name_02        => 'Accept',
        p_value_02       => 'application/json',
        p_name_03        => 'Authorization',
        p_value_03       => 'SSWS ' || l_api_key_c
         );

    l_clob := apex_web_service.make_rest_request(
        p_url => l_org_url_c || '/api/v1/users/' || :G_SUB || '/groups',
        p_http_method => 'GET');

     APEX_JSON.PARSE(p_values => j, p_source => l_clob);

   FOR i IN 1 .. APEX_JSON.GET_COUNT(p_path=> '.', p_values=> j)
   LOOP
        -- add all group names to l_group_names
         apex_string.push (
                  p_table => l_group_names,
                  p_value => apex_json.get_varchar2(p_path=>'[%d].profile.name',p0=> i,p_values=>j));

   END LOOP;

    -- save group names in session
    apex_authorization.enable_dynamic_groups (
        p_group_names => l_group_names );
END p_post_processing;
Click Apply Changes
Paste the Post Logout URL into a browser Tab (i.e the one that ends with APEX_AUTHENTICATION=DOMAIN3 )
OKTA login page will be displayed
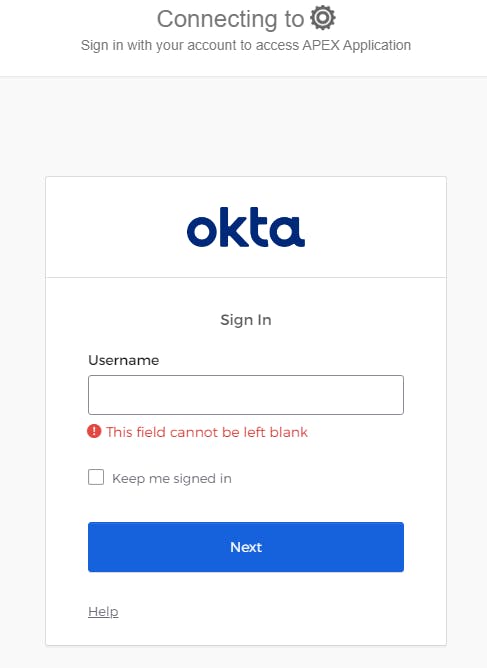
Enter your password and click Verify

Notice that the Supervisor Role has been assigned and the Interactive Report is showing the correct roles

Click on T Product Report and notice that the VPD is accurately showing the 2 records associated with DOMAIN3
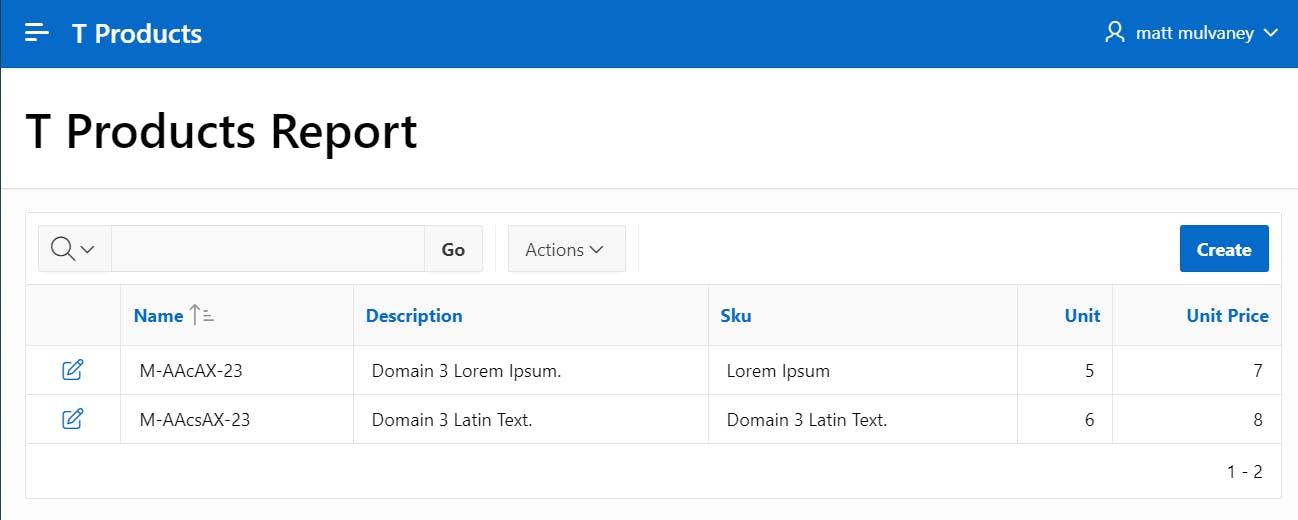
The username is successfully retrieved

Enjoy!