


Create a Glauth LDAP Server on Oracle Cloud Compute and Authenticate with APEX


On occasion, you may require a test LDAP server for whatever reason to test authentication.
In this blog, we'll configure Glauth, have this running on a compute box on the Oracle cloud, and have this accessible anywhere
In the second part of this blog (which is completely optional to follow), we'll configure Glauth to the OKTA Agent to have LDAP as an OKTA Directory Integration.
Setup Glauth
In OCI, view your Compute Instance, Right-click the VCN hyperlink and open the link in a new tab
Click on Security Lists
Click on Default Security List
Click Add Ingress Rule using the following details:
Source: 0.0.0.0/0
Destination Port Range: 3893The picture below is for illustration only
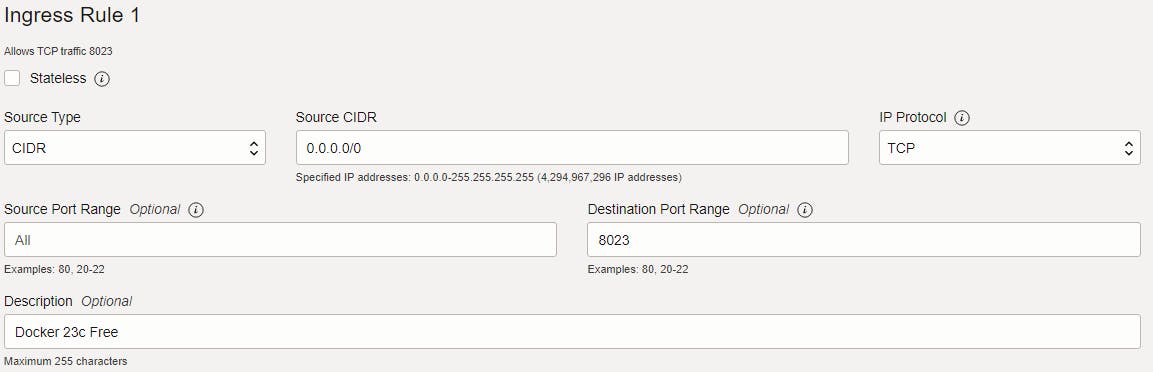
Click Add Ingress Rule at the bottom
Repeat the step above using the following details:
Source: 0.0.0.0/0
Destination Port Range: 5555Click Add Ingress Rule at the bottom
In a terminal box, open ports 3893 & 5555 in the firewall
     YOURPORT=3893
     PERM="--permanent"
     SERV="$PERM --service=Glauthldap"

     sudo firewall-cmd $PERM --new-service=Glauthldap
     sudo firewall-cmd $SERV --set-short="Glauthldap ports"
     sudo firewall-cmd $SERV --set-description="Glauthldap port exceptions"
     sudo firewall-cmd $SERV --add-port=$YOURPORT/tcp
     sudo firewall-cmd $PERM --add-service=Glauthldap
     sudo firewall-cmd --zone=public --add-service=http --permanent
     sudo firewall-cmd --reload

     YOURPORT=5555
     PERM="--permanent"
     SERV="$PERM --service=Glauthldapweb"

     sudo firewall-cmd $PERM --new-service=Glauthldapweb
     sudo firewall-cmd $SERV --set-short="Glauthldapweb ports"
     sudo firewall-cmd $SERV --set-description="Glauthldapweb port exceptions"
     sudo firewall-cmd $SERV --add-port=$YOURPORT/tcp
     sudo firewall-cmd $PERM --add-service=Glauthldapweb
     sudo firewall-cmd --zone=public --add-service=http --permanent
     sudo firewall-cmd --reload
Setup Glauth using the commands below
 wget https://github.com/glauth/glauth/releases/download/v2.2.0/glauth-linux-amd64
 https://raw.githubusercontent.com/glauth/glauth/master/v2/sample-simple.cfg
 chmod +x glauth-linux-amd64
 sudo mv glauth-linux-amd64 /usr/local/bin/glauth
full instructions are here https://github.com/glauth/glauth
Create a start_glauth.sh file
nano start_glauth.shthen type in
 LOGFILE=glauth-`date +"%Y""%m""%d"`.log
 nohup glauth -c sample-simple.cfg >> $LOGFILE 2>&1 & echo "View log file with : tail -f $LOGFILE"
then Ctrl+X to Save. Then type the following to make it executable
chmod +x start_glauth.shCreate a stop_glauth.sh file
nano stop_glauth.shThen paste in
kill $(pgrep -f glauth)then Ctrl+X to Save. Then type the following to make it executable
chmod +x stop_glauth.shRun it
./start_glauth.sh
# ./stop_glauth.sh
It will say something like...
View log file with : tail -f glauth-20230710.logType this command into the console to see the activity.
Since this now runs as a background job, you can exit with Ctrl+C and it will still run the Glauth service.
[opc@lufpod ~]$  tail -f glauth-20230710.log
Mon, 10 Jul 2023 09:46:32 +0000 INF Web API enabled
Mon, 10 Jul 2023 09:46:32 +0000 INF Loading backend datastore=config position=0
Mon, 10 Jul 2023 09:46:32 +0000 INF LDAP server listening address=0.0.0.0:3893
Mon, 10 Jul 2023 09:46:32 +0000 INF Starting HTTP server address=0.0.0.0:5555
Mon, 10 Jul 2023 09:47:06 +0000 INF Debugging enabled
Mon, 10 Jul 2023 09:47:06 +0000 INF AP start
Mon, 10 Jul 2023 09:47:06 +0000 INF Web API enabled
Mon, 10 Jul 2023 09:47:06 +0000 INF Loading backend datastore=config position=0
Mon, 10 Jul 2023 09:47:06 +0000 INF LDAP server listening address=0.0.0.0:3893
Mon, 10 Jul 2023 09:47:06 +0000 INF Starting HTTP server address=0.0.0.0:5555
For APEX use the following Authentication Scheme Settings
Name = LDAP
Scheme Type = LDAP Directory
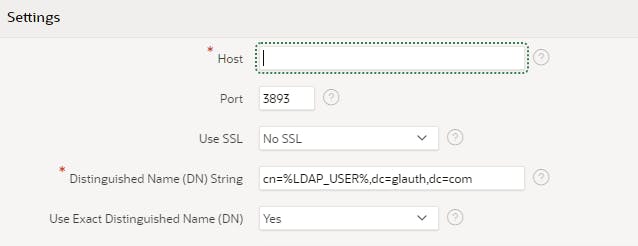
Host = <your Compute IP Address>
Port = 3893
Distinguished Name (DN) String = cn=%LDAP_USER%,dc=glauth,dc=comRun the APEX application and log in with the following user/passwords
User: johndoe
Pass: TestAppPw1
Pass: TestAppPw2
Pass: TestAppPw3

User: serviceuser
Pass: mysecret

User: otpuser <-- Needs 2 factor auth authentication
Pass: mysecret

User: uberhackers
Pass: dogood
You can also run the following to get the groups for user johndoe for example
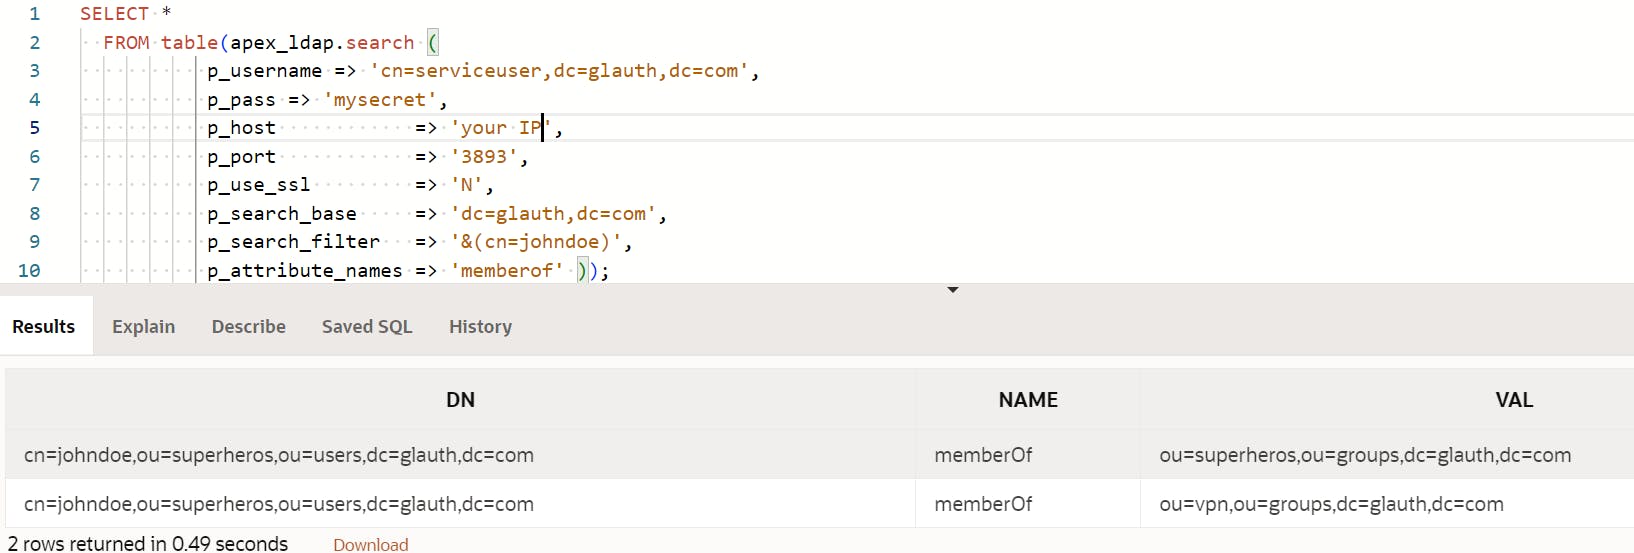
below is the SQL Used
SELECT *
  FROM table(apex_ldap.search (
           p_username => 'cn=serviceuser,dc=glauth,dc=com',
           p_pass => 'mysecret',
           p_host            => '<your Compute IP Address>',
           p_port            => '3893',
           p_use_ssl         => 'N',
           p_search_base     => 'dc=glauth,dc=com',
           p_search_filter   => '&(cn=johndoe)',
           p_attribute_names => 'memberof' ));
Configure an OKTA Agent
There are two approaches here Unix or Windows (there is a Linux installer, but not covered in this blog).
First, follow the Agent steps, then follow the field mapping guides
Unix Agent
In OKTA, go to Directory > Directory Integrations > Add LDAP Directory > Setup LDAP > Download Agent > Download RPM Installer > Copy Link address e.g
https://trial-xxxxxxxx-admin.okta.com/artifacts/JAVA_LDAP/05.16.00/OktaLDAPAgent-05.16.00-xxxxxxxxx86_64.rpmIn Compute type
wget <pasted URL>Install it
sudo yum localinstall OktaLDAPAgent*.rpm -yConfigure it
sudo /opt/Okta/OktaLDAPAgent/scripts/configure_agent.shUse the following settings
base URL = trial-xxxxxxxx-admin.okta.com
LDAP Server Hostname = <your Compute IP Address>
LDAP ADmin DN= cn=serviceuser,dc=glauth,dc=com
LDAP Admin Password = mysecret
Base DN= dc=glauth,dc=com
Use SSL = n
LDAP Port = 3893
Use Proxy = nUse the tail log to see the URL, it'll say something like
Please visit the URL: https://trial-xxx.okta.com/oauth2/auth?code=abcdefPaste that URL into a new browser tab and hit enter
Click Allow Access and then Continue.
The agent has now installed itself as a service.
To Check the OktaLDAPAgent Service status run
service OktaLDAPAgent statusTo start the OktaLDAPAgent Service run
service OktaLDAPAgent startTo stop the OktaLDAPAgent Service run
service OktaLDAPAgent stopBack in OKTA, you can check that the agent is installed

Windows Agent
If you are using a Windows agent, configure it in this way.

LDAP Server = <your Compute IP Address>
RootDN = dc=glauth,dc=com
BindDN = cn=serviceuser,dc=glauth,dc=com
Bind Password = mysecretClick next and next again
Register your OKTA Domain URL e.g. trial-xxxxxxxx-admin.okta.com
Map Glauth fields to OKTA fields
In this next step, we have to configure the Glauth fields to OKTA fields.
Select OpenLDAP
TODO