Adding a 50GB Always-Free Block Volume to your Always-Free Compute Instance
Breaking the Storage Limits of Your Oracle Cloud Free Tier Compute Instance
If you're working with an Oracle Cloud Free Tier Compute instance, you'll quickly discover that the ~27GB of storage that comes with it can be limiting.
Fortunately, Oracle offers an Always-Free Block Volume service that allows you to expand your compute instance storage by up to 50GB at no additional cost.
In this guide, we'll walk through the steps to create and attach an Always-Free Block Volume to your Compute instance and show you how to format and mount it to extend your available storage.
By the end of this tutorial, you'll be able to easily expand your storage capacity without breaking the bank.
Check the current storage of your Compute Instance
df -hyou'll see something like this... here you see I have a 36GB drive on /dev/mapper/ocivolume-root
 devtmpfs                    3.7G     0  3.7G   0% /dev
 tmpfs                       3.8G     0  3.8G   0% /dev/shm
 tmpfs                       3.8G  8.7M  3.8G   1% /run
 tmpfs                       3.8G     0  3.8G   0% /sys/fs/cgroup
 /dev/mapper/ocivolume-root   36G  8.7G   27G  25% /
 /dev/mapper/ocivolume-oled   10G  107M  9.9G   2% /var/oled
 /dev/sda2                  1014M  323M  692M  32% /boot
 /dev/sda1                   100M  5.0M   95M   6% /boot/efi
 tmpfs                       765M     0  765M   0% /run/user/0
 tmpfs                       765M     0  765M   0% /run/user/988
 tmpfs                       765M     0  765M   0% /run/user/1000
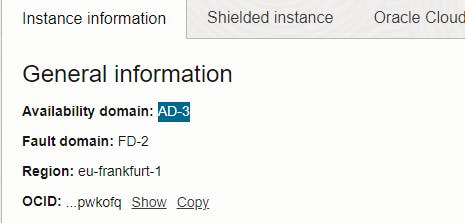
In OCI, make a note of the Availability Domain in your Compute Instance. In my case, its AD-3

In OCI, use the search bar to search for Block Volumes and click on one of the Block Volumes / Services Options

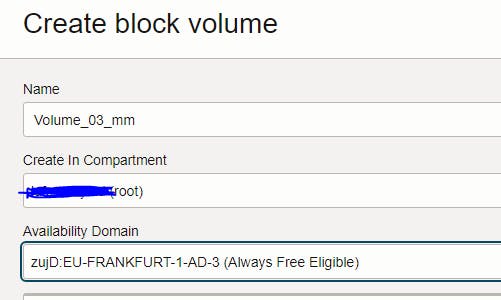
Create a Block Volume in the same Availability Domain as your Computer Instance.

Find your Compute Instance and click Attach block Volume.
Select the volume you just created
If you don't see it in the list, then you may have created it in the wrong Availability Domain.
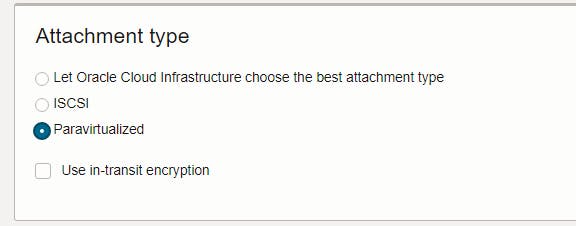
Change the Attachment type to Paravirtualized

Click Attach
Next. Check that the disk is visible on your compute instance by running the command:
lsblkyou'll see a new 50GB disk at the bottom called sdb
 NAME               MAJ:MIN RM  SIZE RO TYPE MOUNTPOINT
 sda                  8:0    0 46.6G  0 disk
 ├─sda1               8:1    0  100M  0 part /boot/efi
 ├─sda2               8:2    0    1G  0 part /boot
 └─sda3               8:3    0 45.5G  0 part
   ├─ocivolume-root 252:0    0 35.5G  0 lvm  /
   └─ocivolume-oled 252:1    0   10G  0 lvm  /var/oled
 sdb                  8:16   0   50G  0 disk
Format the disk by running a command like this:
sudo mkfs.ext4 /dev/sdbCreate a new partition and initialize it as a physical volume
sudo pvcreate /dev/sdb
[y]
Add to the existing ocivolume volume group
sudo vgextend ocivolume /dev/sdbCheck the available drives
sudo pvsResize the Physical Volume
sudo pvresize /dev/sda3Expand the logical volume
sudo lvextend -r -l +100%FREE /dev/mapper/ocivolume-rootCheck the extra size
df -hYou'll now see that the 36GB disk has been increased to 86GB on /dev/mapper/ocivolume-root
devtmpfs                    3.7G     0  3.7G   0% /dev
tmpfs                       3.8G     0  3.8G   0% /dev/shm
tmpfs                       3.8G  8.7M  3.8G   1% /run
tmpfs                       3.8G     0  3.8G   0% /sys/fs/cgroup
/dev/mapper/ocivolume-root   86G  9.0G   77G  11% /
/dev/mapper/ocivolume-oled   10G  109M  9.9G   2% /var/oled
/dev/sda2                  1014M  323M  692M  32% /boot
/dev/sda1                   100M  5.0M   95M   6% /boot/efi
tmpfs                       765M     0  765M   0% /run/user/0
tmpfs                       765M     0  765M   0% /run/user/988
tmpfs                       765M     0  765M   0% /run/user/1000
ENJOY!

